
How to use a stitch marker
Beginner crocheters are often guided towards working on projects that are crocheted in rows (i.e. scarves). However, here at The Woobles, we believe you might find it even easier to learn how to crochet by working in the round, since it means you never need to stop crocheting or turn your work around!
Crocheting in the round starts with crocheting a circle, and then working your way around the circle to build more rounds. It’s easy to lose track of where you are when crocheting in the round because, if things are going well, it should be impossible to tell where one round ends and another begins. Watch the video below for a demonstration on how to use crochet stitch markers to keep track of your rounds:
How to use a stitch marker to keep track of your progress (step-by-step with photos)
Always put a stitch marker under the top loops of the first stitch of your current round. Future you will be oh-so-grateful for a number of reasons:
- You’ll catch mistakes early on. Every time you finish a round, count the number of stitches in the round and make sure it matches the pattern. Use the stitch marker as the starting point for the count.
- When you lose count of your stitches, just start counting from the stitch marker to find your place again.
- When you inevitably make a mistake, undo your stitches up to the stitch marked by the stitch marker. (Otherwise, you’ll have to undo everything every time you make a mistake. And trust me, that’s no fun.)
So do future you a huge favor, and learn how to use stitch markers to properly keep track of your stitches.
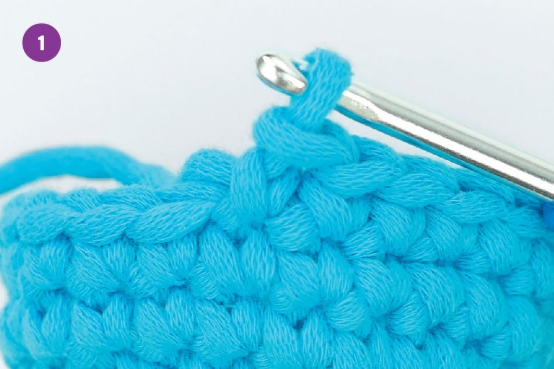
1. Crochet the first stitch of the round.
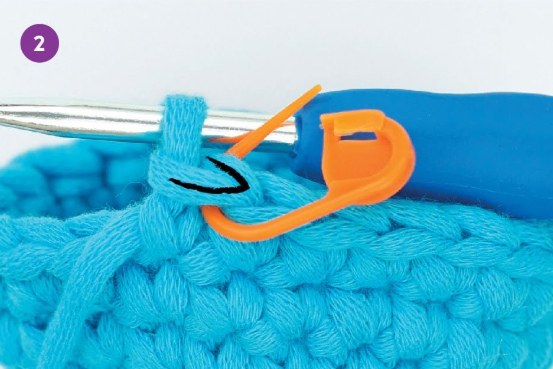
2. Insert the stitch marker under both top loops of
the stitch you just made, and clip it closed like a
safety pin.
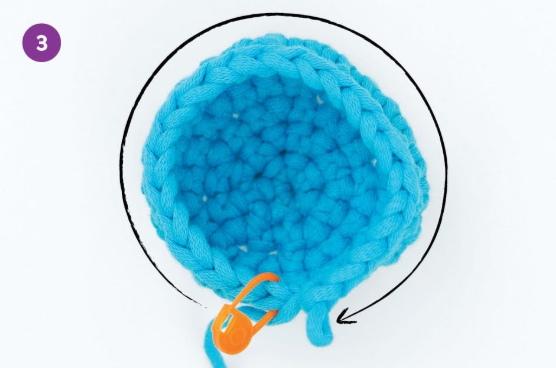
3. Crochet the rest of the round as you normally
would. When you’ve crocheted into the last hole
before the stitch marker, you’re done. Count the
number of stitches in the round, starting with the
one marked by the stitch marker. (Remember, the
loop on the hook does not count as a stitch.) If it
matches the pattern, then congrats! You can move
onto the next round.
TIP
Insert the stitch marker from the front to the back of the piece, with the open edge on the bottom. This way, you can use your thumb to help push the stitch marker open.
Still have questions?
A crochet stitch marker is a small tool that helps you keep track of what round, row, or stitch you’re on in your crochet project. It’s an incredibly useful tool for crocheters.
Stitch markers can be anything from simple plastic pieces to paper clips, floss, safety pins, or even a differently colored piece of yarn. They’re typically attached to the first or last stitch in a row or round. This makes it easier for crocheters to identify which round or row they’re on without having to count manually, which can be confusing, frustrating, and time-consuming. Stitch markers also help keep count between pattern repeats and sections within those repeats.
Crochet stitch markers can be used to show you where to repeat certain stitches, what round you’re currently on, or any other important reference points you want.
Some other creative uses of stitch markers: stitch markers can help you keep track of how many and what kind of stitches you should have in each row. Stitch markers also serve as placeholders when moving onto new sections while crocheting or if a pattern involves complex decreases and increases.
To use a crochet stitch marker properly, slip it under the horizontal V of the stitch you want to mark. At The Woobles, we use stitch markers to mark the first stitch of a round or row. People also commonly use stitch markers to mark where a pattern changes into a new section, such as if you were to change from doing double crochets to single crochets in your work-in-progress.
Still have a question? See our FAQ or e-mail us.